When trying to expand a partition in Windows 11 Disk Management, the Extend Volume option may appear greyed out and unclickable. This prevents you from allocating unused disk capacity to an existing drive letter. According to Microsoft Learn’s guide on extending a basic volume, Disk Management requires specific conditions regarding user privileges, partition placement, and file system formats before a volume can be expanded.
Requirements for Extending a Volume in Windows 11
To successfully extend a partition using native Windows utilities, your drive layout and system state must satisfy four fundamental rules documented by Microsoft:
- Elevated privileges: Disk Management or PowerShell must run with administrative permissions.
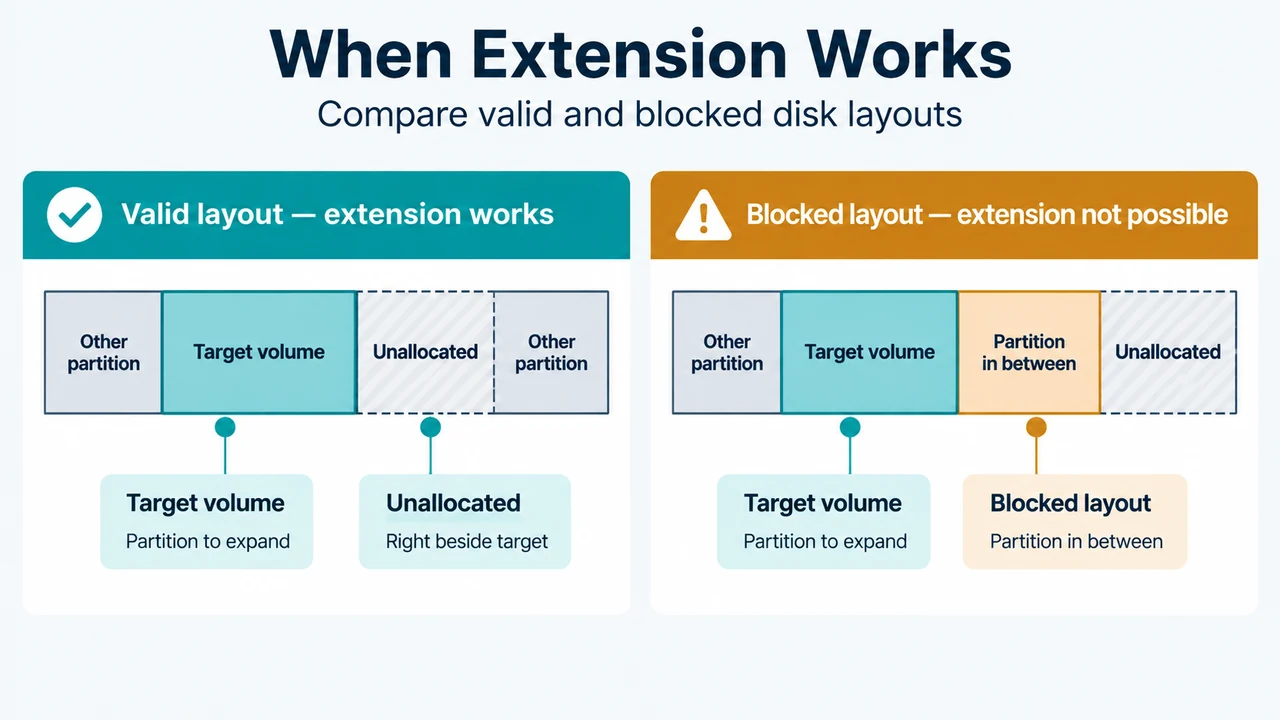
- Immediate adjacency: Unallocated space must be positioned on the same physical disk drive and directly adjacent—immediately to the right—of the volume you want to extend.
- Compatible file system: The target volume must be formatted with the NTFS or ReFS file system. Other file systems cannot be extended natively.
- Disk partition scheme capacity limits: If a volume is on a disk drive larger than 2 terabytes (TB), the disk drive must use the GUID Partition Table (GPT) partitioning scheme rather than Master Boot Record (MBR).
Step 1: Open Disk Management with Administrator Permissions
If Disk Management lacks elevated rights, resizing options may not function properly. Open the utility with administrative permissions:
- Select and hold (or right-click) the Start button on the taskbar, then select Disk Management.
- If the shortcut is unavailable or lacks administrative elevation, type
diskmgmt.mscin the Windows search box. - Right-click
diskmgmt.mscin the search results and choose Run as administrator.
Step 2: Inspect Partition Adjacency and Unallocated Space
In Disk Management, examine the graphical layout of your physical disk drive. Unallocated space is indicated by a black bar labeled Unallocated. To extend a volume, this unallocated block must sit directly after the target volume on the exact same drive.
Disk Management cannot extend a volume if:
- An intermediate partition exists: If another partition (such as a recovery partition, OEM utility partition, or secondary data partition) sits between your current volume and the unallocated space, the Extend Volume option remains disabled.
- Unallocated space is on another disk: You cannot extend a basic volume across multiple physical drives.
- Unallocated space is located to the left: Space preceding the volume cannot be merged using standard Disk Management controls.
Resolving Intermediate Partition Blocks
When an in-between partition separates your target drive from the unallocated space, Microsoft documents three choices:
- Delete the in-between volume: If the partition contains optional data that has been fully backed up, you can delete that volume in Disk Management to merge it into contiguous unallocated space. Caution: Deleting a partition destroys all files stored on it. Always verify backups before proceeding.
- Use non-Microsoft disk partitioning software: Dedicated third-party utilities can move partition blocks without destroying data.
- Leave the layout intact: If the partition cannot be removed or moved, create a new separate volume in the available unallocated space instead of extending the existing drive.
Step 3: Verify the File System (NTFS or ReFS)
Check the file system column in Disk Management for the volume you intend to expand. Windows 11 only permits volume extension on partitions formatted with NTFS or ReFS. Volumes using other file systems cannot be extended.
If your volume is formatted with an unsupported file system, you must first back up or move all files from that volume, reformat the drive using NTFS or ReFS, and then restore your files.
Step 4: Check Disk Size and Partition Scheme (MBR vs. GPT)
If your disk drive exceeds 2 TB, confirm whether the drive is initialized with MBR or GPT. The traditional MBR format cannot address disk space beyond 2 TB. To utilize space on disks larger than 2 TB, the drive must use the GPT partitioning scheme.
Extending the Volume Once Requirements Are Met
Once the prerequisites are confirmed, you can expand the partition using either the graphical interface or Windows PowerShell.
Method A: Using Disk Management
- In Disk Management, right-click the target volume and select Extend Volume.
- When the Extend Volume Wizard opens, select Next.
- Under Select Disks, specify how much available space to allocate (the wizard defaults to the maximum available capacity).
- Select Next, and then select Finish to complete the process.
Method B: Using Windows PowerShell
You can also extend an NTFS or ReFS volume via elevated PowerShell using documented storage commands:
- Type
Windows PowerShellin the Windows search box, right-click it, and select Run as administrator. - Run the following commands to resize the volume to its supported maximum size, replacing
Cwith your designated drive letter:
# Variable specifies the disk drive to extend
$drive_letter = "C"

# Get the partition sizes
$size = (Get-PartitionSupportedSize -DriveLetter $drive_letter)

# Resize the partition to the maximum size
Resize-Partition -DriveLetter $drive_letter -Size $size.SizeMax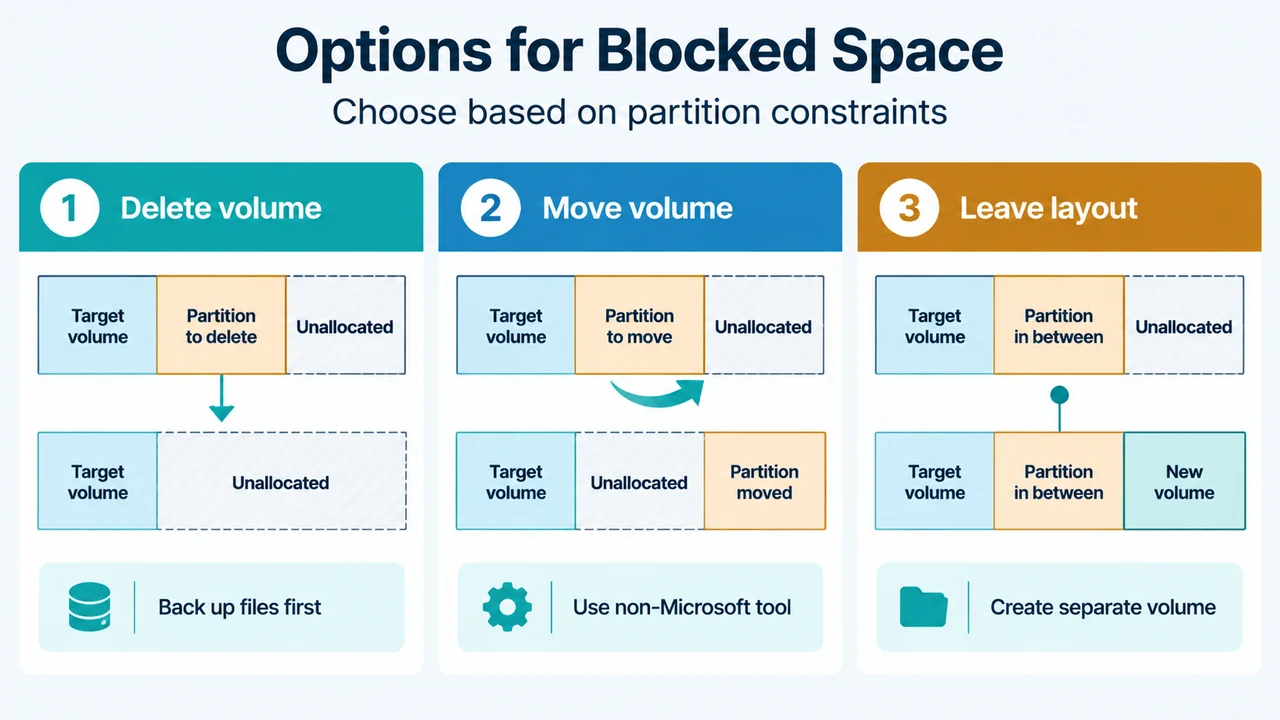
Text version of the diagrams
- When Extension Works: Target volume — Partition to expand; Unallocated — Right beside target; Blocked layout — Partition in between
- Options for Blocked Space: Delete volume — Back up files first; Move volume — Use non-Microsoft tool; Leave layout — Create separate volume
Research Method and Limitations
This troubleshooting guide was compiled directly from official Microsoft technical documentation detailing storage prerequisites and volume extension procedures. No hands-on testing, laboratory benchmarks, or empirical failure rate measurements were conducted. External competitor articles were not accessible during research; this assessment relies strictly on primary vendor guidance provided by Microsoft.